TheSchoolRun.com closure date
As we informed you a few months ago, TheSchoolRun has had to make the difficult decision to close due to financial pressures and the company has now ceased trading. We had hoped to keep our content available through a partnership with another educational provider, but this provider has since withdrawn from the agreement.
As a result, we now have to permanently close TheSchoolRun.com. However, to give subscribers time to download any content they’d like to keep, we will keep the website open until 31st July 2025. After this date, the site will be taken down and there will be no further access to any resources. We strongly encourage you to download and save any resources you think you may want to use in the future.
In particular, we suggest downloading:
- Learning packs
- All the worksheets from the 11+ programme, if you are following this with your child
- Complete Learning Journey programmes (the packs below include all 40 worksheets for each programme)
You should already have received 16 primary school eBooks (worth £108.84) to download and keep. If you haven’t received these, please contact us at [email protected] before 31st July 2025, and we will send them to you.
We are very sorry that there is no way to continue offering access to resources and sincerely apologise for the inconvenience caused.
What is a program?

What is a program?
In computing, programs are a defined set of algorithms or processes that are completed in order to achieve a task.
A program is created using a programming language, which allows a computer programmer to write lines of code that the computer can understand. Everything that a computer does is achieved using a program, whether that be browsing the web with Mozilla Firefox or processing a document using Microsoft Word. Firefox and Word are both examples of programs.
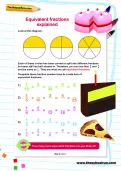
Start a unique learning programme!
- Weekly programme for each school year
- Worksheets sent direct to your inbox
- Keeps your child's learning on track
How children learn about programs in KS1
At KS1 students are taught that programs are a set of instructions to complete a task and this will normally be taught through a practical activity where students will have to program a robot. This program will simply be a set of instructions for the child’s robot to follow, whether that be something as simple as moving from point A to point B or something much more complex like fetching a pencil.
There is very little difference to the way that algorithms and programs are taught at KS1 and KS2 level as the two go hand in hand. A program is just a collection of algorithms put into order to do something useful, but the low-level principles required to understand them both are very similar.
A wide number of games and techniques are used to teach children about writing programs, but the majority of them are all based on something called a programmable floor robot or turtle robot. Turtle robots were designed in the 1940s as a way to quickly teach programmers and engineers the fundamentals of computer science, and the tradition still stands today.
An extremely popular turtle robot used in schools at KS1 is the Bee-Bot. This turtle robot is designed to look like a bee, but the principles are the same. There are buttons on the robot that allow your child to input instructions such as turn right, turn left and move forward or backward. By inputting instructions one after another your child can make the bot move in any number of ways.
Although the Bee-Bot is widely used it is far from the only option used to teach your child at KS1. There are a number of robots available on the market, but they all work in similar ways and provide an introduction to writing algorithms for your child.
How children learn about programs in KS2
At KS2 the curriculum builds on everything that is learned at KS1. In KS1 your child learns what an algorithm is and will spend time writing their own algorithms as long lists of instructions. If we want to make more complicated or automatic algorithms then we need to introduce more complex techniques. At KS2 more advanced programming concepts are taught, teaching students about ideas such as loops and conditional logic.
If we were programming a robot and wanted it to move from one end of a room to the other, then there are two options we could use to write an algorithm that achieved this.
- We could count how many steps forward the robot had to take and then explicitly write an algorithm that took this many steps. But imagine if the room were a mile long; it would take us a long time to count how many steps the robot had to take. Also, what would we do if we wanted our robot to move across another room that was only half a mile long? We would have to write a whole new program to achieve a very similar task.
- The second option would be to use something called a loop. A loop is able to repeat an instruction either indefinitely, a set number of times or until some condition is met. In the case of our robot, we might want to write a loop that continuously has the robot move forward over and over again.

This diagram shows a very simple flowchart of what the algorithm might look like. A flowchart is used to show processes and decisions made in an algorithm, whilst the arrows are used to show the flow of the program. Processes are shown as squares and are used when we are doing something. Decisions are shown as a diamond and are used to represent when we are testing something.
One issue with the algorithm we have written is that when the robot reaches the end of the room it will attempt to keep moving forward, repeatedly crashing into the wall until it runs out of battery! To deal with this issue we need to use something called a condition.
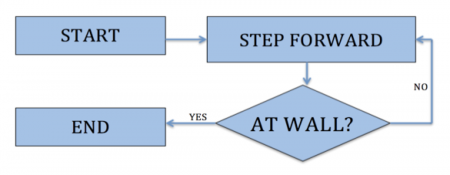
The diagram above shows another algorithm we could use for our robot. This time, however, rather than stepping forward forever we have used a condition that stops the algorithm when our robot hits the wall.
Primary-school programming: understanding the task
Before a programmer can start to write a program to achieve something they first have to understand the task. A good example of a task given at primary level would be to make a turtle robot move from one point to another. Look at the image below and try to work out what you are being asked to do: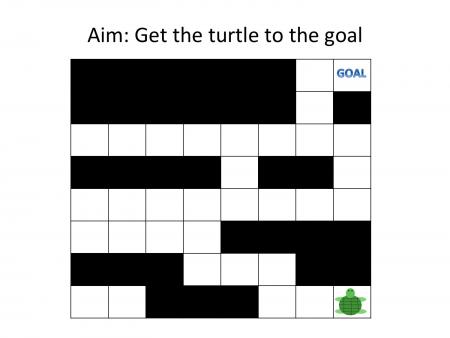
This is a very simple task where you need to move your turtle robot in the bottom left of the screen to the goal without going through any black squares. Seems easy enough, right?
Primary-school programming: planning
Now that you understand the task at hand, the next step is to plan ahead for what you want to achieve. In the case of our task we need to plan a route through the maze to reach the goal. There are multiple routes, but we have counted the number of squares traversed for each route to find the shortest path: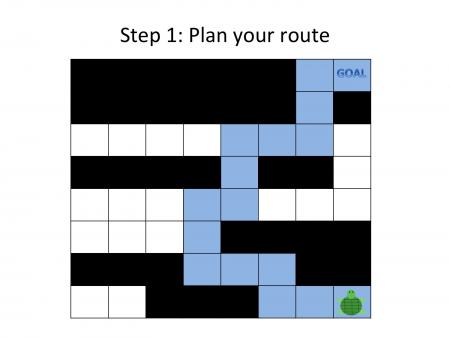
We now have our optimal path highlighted in blue so we know where we want our robot to go. The only issue is, we have no way of giving the robot any instructions. The next thing we need to do therefore is decide what our robot is and isn’t allowed to do.
Primary-school programming: defining your instruction set
Understanding the task and planning ahead isn’t enough to write our program. Imagine we created a robot but gave it no buttons or any controls. It could be the best robot on the planet but, without a way to use it, it would still be completely useless. Therefore our next step is to write an instruction set for our robot so that we know what it can and can’t do: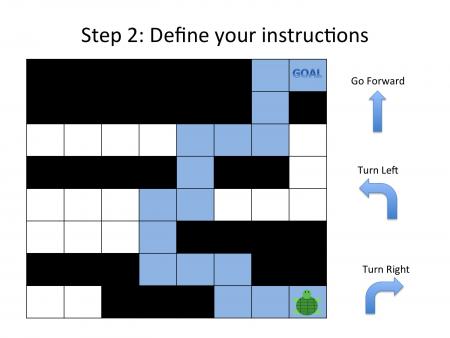
Our instructions include a way for our robot to move forward, as well as turn right and left. We could also have added in an instruction for our robot to take a drink of water or do a backflip; these instructions would not have been useful to completing the current task however so we haven’t included anything else.
At a future date we could come back and add more instructions to our robot to allow it complete new tasks, as well as the ones for which it was originally designed. The ability to add new features into a program is extremely important when writing code but must be considered before the start of a project (for example, we could never include an instruction for our robot to take a drink of water if when we designed it we hadn’t made it waterproof!).
Primary-school programming: writing your program
Once you have planned your program and provided an instruction set for you to use, it’s time to write a program: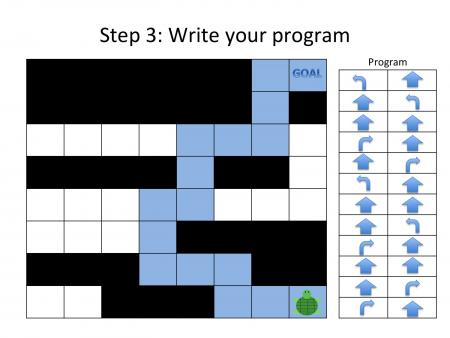
The image above shows a program that should get our turtle to the goal. Read all the way down the left column first, and then the right column. In essence, this is our program. You may recognise that this program is actually just an algorithm; a program does not need to be complex and have multiple algorithms if one simple algorithm is able to achieve the task on its own.
As the tasks we want our robot to complete become more complex, however, a single algorithm will not usually be used as the more complex the task, the more complex an algorithm would need to be to complete it. Therefore we would break our program into a series of algorithms, each completing a smaller part of the overall goal of the program.
Primary-school programming: test your program
Have you ever been on your computer when a program has quit unexpectedly? Or gone to a web page and found that it’s just a mass of text without any colour or style? This is known as a computer bug; computer bugs stop the code we have written from working as intended. The way we deal with computer bugs is through a technique called debugging which does exactly what it says on the tin: it helps us remove bugs from a program. The main way we debug a program is through testing to check that it works as intended: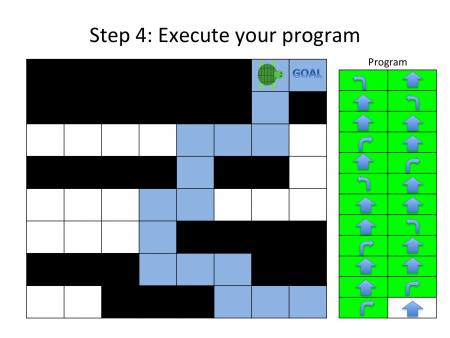
We have tested our program by running the instructions one at a time to check that the end result is what we intended to happen. If it isn’t then we will need to go through our program and debug it to find any errors and fix them.
Our algorithm was correct and therefore our program has worked as intended. However, imagine if we changed the first instruction in the program to be a turn right, instead of a turn left. We would completely change the outcome of the program with one minor error. This is the problem with bugs in programs; even the smallest error can have a knock-on effect that will affect the outcome of our program.
Programming in primary school: what your child learns year-by-year
Please note that the following guidelines for what is taught in each primary year is for guidance only and may not be representative of the way computing is taught at your child’s school.
Year 1
Students will learn what a computer program is and what programs are used for.
Year 2
Students start to write basic programs for a programmable floor robot that follows pre-determined paths.
Year 3
Students will be given a robot program and have to identify problems and how to fix them.
Year 4
Students may be introduced to a visual programming language such as Scratch.
Year 5
Students will write basic programs to move a character on the screen in a visual programming language such as Scratch.
Year 6
Students will make use of loops and conditions in a visual programming language such as Scratch.


